Showing posts with label Chocolate. Show all posts

Sunday, June 12, 2011

Workin' It

All of it. The land, the bod, the freezer. Not necessarily in that order.


The pressure is on, because I got rid of all my bigger-size clothes so now I have no choice but to eat gruel for breakfast. Occasionally, I splurge on a raisin.


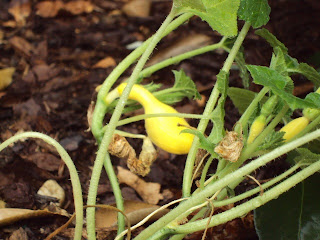
So far, the 2011 harvest does not look like it'll recoup the cost of the plants, but that's OK. I love seeing this baby squash right now -


And the tomatoes....


Aaaahhh, summer! We're also workin' some thyme, basil, and rosemary.


As for the freezer, this little concoction is FAB. If you have kids, or 95-degree weather, this is a good one to do with them since there's no stove involved. Can I get an amen?


From Clean Eating magazine:


1 baked pie crust


5 small, ripe or slightly overripe bananas


1 tsp vanilla extract


1 cup light coconut milk (this is different from coconut cream, which is thicker and much sweeter)


1/4 cup cocoa powder (I used dark cocoa, because that's what I have. Regular works fine).


Optional - chopped peanuts


1. Peel and slice bananas.


2. Add banana pieces, vanilla extract, coconut milk, and cocoa to the jar of a blender. Puree, stopping to scrape down the sides every so often.


3. Pour the banana puree mixture into the pie shell - sprinkle peanuts on top if you wish. Wrap tightly with plastic wrap and freeze at least 4 hours.


4. Put pie in refrigerator for at least 30 minutes before serving.

Sunday, May 30, 2010

Classics

This whole gluten-free business has thrown me into a tizzy cooking-wise. Here's the scoop:

a) Unlike going vegetarian, going gluten-free is not going to result in dramatically improved health and well-being UNLESS you have a sensitivity to gluten.

b) It's not as much of a tragedy problem as I expected. Do I miss bread? You bet. I've got some brown rice flour "bread" that, well, it'll do, but it for darn sure isn't fluffy sourdough. That said, it also doesn't make me ill.

So there's that.

c) Once I found good cereal and good (quinoa) pasta, things fell into place reasonably well.

d) Gluten-free goodies include tortilla chips, chocolate, ice cream (unless there are mixed-in yummies like, say, Oreos), and wine. Yes, one can be just as un-virtuous on a gluten-free diet as if they had access to pie.

e) Crushed corn flakes make excellent breading for fish and chicken.

For Sunday dinner we had fish & chips, and I had brownies (happy, happy, joy, joy!) for dessert. "Brownies" is what the cookbook ("The Fitness Kitchen") calls them - "chocolate cheesecake filling" is what I call it and I absolutely adore it. They're chocolate and yummy and rich and, seriously, I would make these even if I could have regular brownies. Probably not instead of brownies, mind you, but...

I roasted some Yukon Gold potato wedges at 450 degrees for half an hour, with regular stirring and a good drizzle of oil. Actually, I put the garlic-infused oil, then the potato wedges, in a large Ziploc bag and tossed to coat. For the last 10 minutes I turned the oven down to 425 degrees so that I could put the fish in as well.

The fish was regular, inexpensive frozen cod from Trader Joe's. It's not a big deal if your pieces of fish are different length/width as long a they're reasonably close to the same thickness. I used a very sharp knife and cut a few pieces in half.

The source recipe is here: My changes (baking instead of frying, corn flakes instead of bread crumbs) are below.

CRISPY OVEN-FRIED COD

1 cup crushed corn flakes
1 cup cornmeal
1 teaspoon seasoned salt
1 tsp garlic powder
1/4 teaspoon cayenne pepper
4 codfish fillets
2 large eggs, slightly beaten

Preheat oven to 425 degrees. Prepare a baking sheet (line with foil if you wish) with wire racks. Mist racks with cooking spray.

Lightly beat two whole eggs with a fork; place in a shallow dish.

Place crushed cornflakes, cornmeal, salt, garlic powder, and cayenne in a separate shallow dish and mix well.

Dip one fish fillet in egg, making sure both sides are covered. Dredge both sides of filet in cornflake mixture, and place on wire rack.

Follow with other pieces of fish; do not allow pieces of fish to touch on the rack, or they won't crisp properly.

Bake at 425 degrees for 12 - 15 minutes.


CHOCOLATE CHEESECAKE BROWNIES
The Fitness Kitchen, by Shelly Sinton

1 (8-ounce) package reduced-fat cream cheese, softened at room temperature
1 cup light sour cream
1/3 cup unsweetened cocoa powder (I use dark chocolate cocoa)
2 TBSP cornstarch
2/3 cup sugar
2 eggs
1/3 cup semisweet chips

Preheat oven to 325 degrees. Line an 8-inch baking dish with parchment or waxed paper.

Blend cream cheese and sour cream until smooth. Add cocoa powder, cornstarch, sugar, and eggs. Blend until smooth, scraping down the ides of the bowl a needed. Pour the mixture into the baking dish and sprinkle with chocolate chips.

Bake until just set, 35 - 40 minutes, then let cool 20 - 30 minutes. Refrigerate for at least one hour (I just keep them in the fridge).
Tuesday, March 23, 2010

Ah, Chocolate...

These yummies from this month's "Everyday Food" magazine have been a big hit at my office (and with Sweetie). I halved the amount of chili powder, but will probably go to the full amount next time. Also, I used about half regular cocoa powder (to use up the open box) and the rest dark chocolate cocoa (which I had been dying to get into). I sooooo recommend dark chocolate cocoa!

Mexican Hot-Chocolate Cookies

Cookie
2 1/4 cups all-purpose flour
1/2 cup unsweetened cocoa powder
2 teaspoons cream of tartar
1 teaspoon baking soda
1/2 teaspoon coarse salt (regular is fine, just use a smidge less)
1 cup (2 sticks) unsalted butter, room temperature
1 3/4 cups sugar, divided
2 large eggs

Rolling Sugar
1/4 cup sugar
2 teaspoons cinnamon
1/2 teaspoon chili powder (optional)

1. Preheat oven to 400 degrees.

2. Cream together butter and 1 1/2 cups sugar on medium speed until light and fluffy. Scrape down sides of bowl. Add eggs and beat to combine.

3. With mixer on low, gradually add dry ingredients and combine thoroughly.

4. In a small bowl combine 1/4 cup sugar, cinnamon, and chili powder (if using). Using heaping tablespoons, form balls of dough and roll in cinnamon-sugar mixture.

5. Place, about 3 inches apart, on parchment-lined baking sheets. Bake until cookies are set in center and begin to crack, about 10 minutes.

Let the cookies cool on the sheet for a few minutes before handling.

Sunday, September 27, 2009

Gimme Some Sugar

Well, someone in Atlanta pissed off Mother Nature and she took her revenge. Flooding - and two years ago, drought. And when I was looking for someone to clean the gutters (24 inches of rain is a terrific way to find out if it needs to be done), I came across an ad that mentioned "French drain cleaning," which sounds really personal.

No progress on home maintenance and I'm working frantically on a Federal grant application for work, so I've been a smidge remiss wth updating stinkycheese. Oh, and I'm totally obsessed with home decor and furniture refinishing right now and it's more time-consuming than I realized. I'm the Martha Stewart of Spray Paint these days and I have fawning blogger-girl-crushes on Centsational Girl and whoever writes the DIY Showcase.

Ahem.

As mentioned earlier, Tat has a terrific opportunity to start from scratch and assemble a basic kitchen. Hair stylist, pinup model, tattoo afficionado - she really doesn't describe herself as "domestic." But we all gotta eat - even pinup models - and she wants to be able to throw something together without being dependent on the Lean Cuisine selection.
She asked for a What Tat Needs For A Basic Kitchen writeup, and here 'tis. I'm pulling pictures from Target because they're nationwide and usually have some very affordable options. If you have a Bed, Bath, and Beyond in your area, that's also a good choice and they constantly have 20% off coupons out there.


THE STUFF THAT GETS HOT


What's the deal with the "Gimme Some Sugar" title? It's this - get a 4- or 5-pound bag of sugar (or rice or flour or whatever) from the grocery aisle. You need to make sure that the handle(s) of whatever you're buying are firmly attached, so before you buy anything put the bag of sugar in the pot or pan and see how secure those handles feel.


Also, while you want pieces that have a nice heft, you don't want anything so heavy that you're in danger of dropping it while it's hot. My still-battlescarred dogs would agree. You also want a nice thick bottom on both a skillet and a saucepan. A thin bottom will scorch your food, and it will burn on the bottom and still be cold/raw on top.


A word about lids - clear glass or plastic lids steam up in half a heartbeat and, at that point, they're no different from a regular, opaque lid. Plus they're a pain to clean. Just sayin'.


A small skillet (about 8 inches across), also called a saute pan, is essential. You know, I use mine so much I may get a second.


Non-stick is often easier for cleanup; non-nonstick will give a better, browned crust if that's what you're looking for. Cast iron is probably more maintenance than you want to do if you're a casual, I-just-wanna-eat cook.


Expect to spend between $15 and $30 for a good one. DO NOT cheap out on a no-name non-stick skillet at Family Dollar or Big Lots, because the non-stick coating will, sooner or later, flake off into your food. The one pictured, which may be the one I have, is the Farberware 8" Professional Skillet for $16.99.


What can you do with one? They're perfect for fried or scrambled eggs, a hamburger, a pork chop or chicken breast, cooking some chopped veggies. If you cook for a one-person household, you've got to have one.

A large skillet - same as for the small skillet, and it's terrific for stirfry or making taco meat or a nice big piece of fish, but you don't need to spend the money unless you frequently cook for 3 or more people or cook extra to freeze. If you almost always cook for one, the purchase can wait.

A saucepan - also, as a guy on Amtrak once realized, called a "pot." These are perfect for
boiling water for rice or pasta, making hot chocolate, heating up tomato sauce or canned veggies.


My medium-size saucepan is a 2-quart, and it's the one I use most often. My li'l one-quart is fantastic for my new carb-conscious serving sizes of pasta, making oatmeal, or heating up soup for one. Be sure to get one with a lid so that you can trap the steam and cook faster.


Some lids have steam vents. Isn't "don't touch a hot pot on the stove" about as basic as it can get? I mean, my dogs know that - even the dumb one. And yet, what would you do with a steam vent? Poke it open and closed when it is clearly so hot it's producing steam. No thanks. You can just rest the lid mostly-on-but-a-little-offset to release steam.


Casserole dishes don't have to be for "one can of Campbell's Cream of Some Icky Stuff" dishes. They're for (yay!) baked mac & cheese, lasagne or ziti, and can even do a small roast (2-pound turkey breast, for example, or a small ham).


LEARN FROM MY MISTAKE and be sure to get one with handles! My very chic white casserole dishes are beautiful but terrifying when trying to get them out of the oven.


Searching Target's website for "casserole" brought up some really pricey options, and some less expensive ones that I wouldn't recommend. But searching for "Pyrex" brought up this terrific option for all of $8.50. I still have and use my grandmother's Pyrex dishes.

And a search for "Corningware", another have-it-for-life company, brought up this very nice 4-quart casserole; be careful with Corningware, though, because of the handle issue.
We're not going to get into baking or anything fancy just yet. There's a whole lot more on the market, but if you want the bare essentials, this is it.

As for gadgetry, most of which I'm pretty sure doesn't require pictures -


  • At least one wooden spoon. They never get hot and they don't scratch non-stick.


  • At least two pot holders - your mileage may vary, but I can't get a good grip on anything with those sheets of silicone, no matter how cute they are.


  • A decent chef's knife - it will be labelled "chef's knife" and it should be very, very sharp. It's actually more dangerous to cut with a dull knife, since you apply excessive pressure to it and can't control it. These can quickly get expensive, and I say they're worth every penny. I also like this Oneida knife, and its li'l buddy - $19.99 for the set. But if you have the funds and want to get a really good knife, go for a Santoku like this Henckels for $29.99.

  • A cutting board - never, ever, ever cut on glass. Spring for a bamboo cutting board; it doesn't have to be one of the ten-pounders, either. We have at least 4 in the house, and I use the little (4" x 6") quite a lot to slice one tomato or some herbs or strawberries or whatever.
  • A digital meat thermometer - tremendously important, especially if you're new to this world of "food" and you're afraid you're going to kill your dinner guests with improperly cooked food (I swear I still feel that way about canning - "Merry Christmas! It's botulism - I made it myself!"). The $10 to $15 you'll spend on one of these babies will be well, well worth it. And hold onto the card that says pork should be X degrees and turkey should be Y degrees and so on.

  • A few glass or metal mixing bowls - plastic can hold odors and stain (yes, I mean YOU, spaghetti sauce). If you go with metal make sure it's weighted at the bottom, or else you'll give it a stir and send it flying across the counter. From, um, what I've heard.

  • Measuring cups and spoons

  • Grater - I can't find mine on the Target site, but this is close - mine doesn't have a little boxy-thing on the top and for darn sure it wasn't pushing $20. It takes up much, much less room than a box grater, and I've been known to put mine on top of a saucepan full of pasta and drain the water into the sink. I LOVE things that have more than one use!

  • If you don't have one on your stove, a kitchen timer is essential. Many a would've-been-terrific meal took a Hefty vacation after someone said "Oh, I'll just remember to take it out in 45 minutes."

And since I PROMISED a recipe, and the sugar title has me in a mood for dessert (like I need any prompting) here 'tis:
Hazelnut Crinkle Cookies
3 cups all-purpose flour
2 tsp baking powder
1/2 tsp salt
1 11-ounce jar Nutella (also known as "nectar of the gods" or "chocogasm")
1/4 cup shortening (butter or Crisco)
1 1/3 cup sugar
1 tsp vanilla
2 eggs
1/3 cup milk
1/2 cup chopped, toasted hazelnuts
2 cups finely chopped hazelnuts
Powdered sugar
Stir flour, baking powder, and salt in a mixing bowl - set aside.
Beat Nutella and shortening. Add sugar, beat until fluffy. Add vanilla and eggs - beat until combined.
Alternately add flour mixture and milk. Str in 1/2 cup chopped hazelnuts. Cover and chill at least one hour.
Preheat oven to 375 degrees.
Shape dough into 1- or 1 1/2-inch balls. Roll in finely chopped nuts, then roll in powdered sugar. Place 2 inches apart on lightly greased cookie sheet. Bake 8 - 10 minutes, or until cookie surface has cracked and set.

Friday, December 26, 2008

Is the Cookie Curse lifted?

Well, probably not - these are more assembled than baked.

I shipped a bunch of these up north and my Mom reports they were a hit. I don't care if she was just being nice. At this low point in my cookiemaking, I'll take it. If there's a New Year's Day party this year, I may bring these along.

Chocolate Bourbon Balls
2 1/2 cups vanilla wafer crumbs
1/2 cup confectioners' sugar
1 cup peca halves, finely ground in food procesor
6 ounces semisweet or bittersweet chocolate, broken into pieces*
1/2 cup bourbon
3 Tablespoons light corn syrup
Granulated (regular white) sugar

1. Place cookie crumbs, confectioner' sugar, and ground pecans in a large bowl and stir to combine.

2. Melt the chocolate in microwave or in top of double boiler over simmering water. Stir in the bourbon and corn syrup. Add chocolate mixture to dry mixture and stir well to combine. Let sit for 30 minutes. Place some granulated sugar in a small bowl.

3. Roll mixture between your plams into 1-inch balls, then roll in sugar to coat evenly. Place balls in airtight container, separating layers with aluminum foil or waxed paper, and allow flavor to develop by sitting at room temperature at least overnight.

*Chocolate chips may not work as well as bar chocolate. Chocolate chips are formulated a little differently to better withstand high temps and keep their shape in cookies.

Tuesday, September 23, 2008

If Mom Made Brownies Like This I'd Have Moved Next Door

This Cook's Illustrated article talks about trying to find brownies like Mom used to make. My mother is a terrific baker, legendary for her many varieties of homemade cookies, but when it came time to make brownies she and all the other Moms reached for a box of Betty Crocker. And, contrary to what our anal-retentive Cook's Illustrated friends have to say, some of the boxed mixes (mmmm... Ghirardeli Double Chocolate Brownie mix) are pretty good.

There's "pretty good" and there's a transcendent chocolate experience, and everyone should have one of those at least once. That's asking quite a lot of a simple baked good, isn't it? But this brownie can rise to the occasion and it's absolutely worth the effort and expense.

I know, I know, I bust on CI's Goldilocks reviews (this was was too soupy, this one was too dry, this one was just right!!) but really, their recipes are unparalleled.

My preference was to leave the nuts out, since a co-worker is allergic and there was absolutely no way I was keeping all of these at home. It calls for cake flour, and it really does make a difference to use cake flour and not all-purpose. Look, if you're going for a definitive dessert occasion, spring the $2.50 for the cake flour to take it all the way. Ditto for decent chocolate. You don't save up to go to Hawaii and stay in the hotel room, you don't get your driver's license and insist on sitting in the back seat. If you're in, you're IN.

This is not really a new-to-baking recipe. But if you're feeling more confident in the kitchen than you did six months ago, why not give it a try when you have some time to devote to it? At the very worst it will end up as an intensely chocolatey goo that would be great on ice cream, or as intensely chocolatey crumbs - that would be great on ice cream. If this is a first-time effort on a more complicated recipe, don't promise to bring them to the neighborhood potluck. Who needs that kind of pressure? Commit to bringing napkins or bakery cupcakes, and wow them with these if you're happy with the result. Better yet, tell someone who knows how to use a double-boiler that you'll trade brownies for some company in the kitchen and a quick lesson.

Brownies
1 cup (4 ounces) pecans or walnuts, chopped - optional
1 1/4 cups (5 ounces) cake flour
1/2 teaspoon salt
3/4 teaspoon baking powder
6 ounces unsweetened chocolate, chopped fine (not "bittersweet" - use unsweetened chocolate or "baking" chocolate. Ghirardelli or Lindt is preferred; Baker's chocolate is the Waikiki Holiday Inn)
12 tsp (1 1/2 sticks) unsalted butter, cut into small pieces
2 1/4 cups sugar
4 large eggs
1 tablespoon vanilla extract - to experienced bakers this sounds like too much. It's not.

1. Adjust oven rack to middle position; heat oven to 325 degrees. If your oven doesn't have a true middle, use the upper-middle.

2. Cut aluminum foil and fold lengthwise to 8-inch width. Fit foil into the length of a 13x9-inch baking pan; allow excess foil to hang over the pan edge. I stopped there and it worked fine; the recipe says to cut another length of foil to put width-wise in the pan. Do be sure to use at least one - the foil overhang serves as a handle to let you lift the brownies right out.

3. Spray foil-lined pan with nonstick cooing spray.

4. If using nuts, spread nuts evenly on a rimmed baking sheet and toast in the oven 5 - 8 minutes. So says the recipe - I say DO NOT let them go as long as 8 minutes. Nuts have a funny way of becoming toasted, then burnt, then just bursting into flame.

I will not entertain questions about this.

5. Whisk to combine flour, salt, and baking powder in medium bowl; set aside.

6. Melt chocolate and butter in large heatproof bowl/double boiler, stirring occasionally, until smooth. When chocolate mixture is completely smooth, remove bowl from saucepan and gradually whisk in sugar. Add eggs one at a time, whisking after each addition until thoroughly combined. Whisk in vanilla. Add flour in three additions, folding with rubber spatula until batter is completely smooth.

7. Transfer batter to prepared pan; using spatula, spread batter into corners of pan and smooth surface. Sprinkle toasted nuts (if using) evenly over batter and bake until toothpick or wooden skewer (dry spaghetti works, too!) inserted into center of brownies comes out with few moist crumbs attached, 30 to 35 minutes.

8. Cool on wire rack to room temperature, about 2 hours, then remove brownies from pan by lifting foil overhang. Slice into 2"x2" squares and serve.